Building a Spherebot
In this article I will give you some up-to-date instructions on how to build your own Eggbot/Spherebot derivative.
In this article I will give you some up-to-date instructions on how to build your own Eggbot/Spherebot derivative. This is still rough and not fully fleshed out, because I'm still in the process of tuning the build.
I hope these instructions are useful for future Spherebot builders.
Construction
I started out with the Spherebot files by Glasswalker on Thingiverse. Print all the files. This was not that easy. I'm using Cura to slice and I'm getting very bad results for the end plate. But in the end it worked out.
With all the parts printed, make sure that the threaded rods go easily into the end plates. Take your time and make them easily slide through the holes in the end plates. At first I didn't do that and I had some parts break because of that. So be careful.
In general I had problems with the printed parts. Many holes are just too tight to fit rods and axles through them.

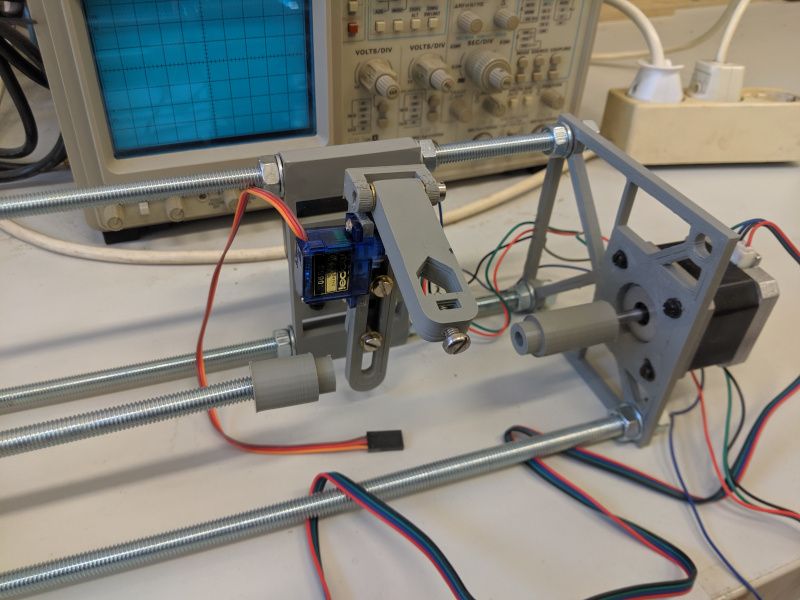
I'm still fighting with pen arm shaft coupler to properly fit onto the shaft of one of the stepper motors. It fits badly and sometimes just falls off.
I used NEMA17 stepper motors for the two axes, they fit perfectly. For the servo I used this product from Amazon. They fit but it's pretty hard to tighten them. I need to glue them with proper glue. Despite the motors and servos you need a couple of small metric screws. Fortunately the Welcome Werkstatt had all of these in stock, so I did not order anything for that part.
Electronics
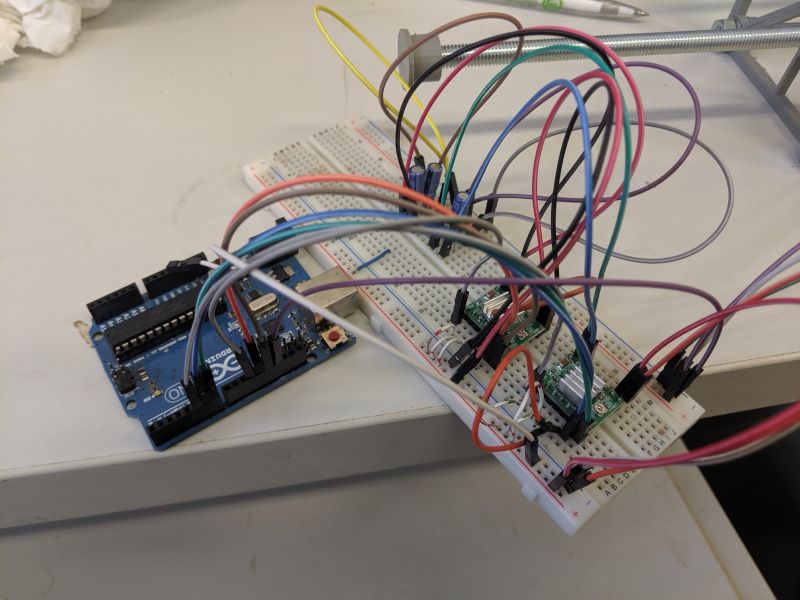
When everything is assembled as per the directions given by Glasswalker, you're ready to start working on the electronics side of things. I used an Arduino Uno for the controller and A4988 DMOS stepper drivers to drive the motors. With this setup, don't use the old Arduino sketch you find linked on Glasswalkers Thingiverse site, instead use thunderbug1's Arduino sketch that is part of his Github repo for the Spherebot Host GUI.
If you use the Spherebot Firmware from thunderbug1 you'll have to set the stepper drivers to 16-step microstepping. Also, note that the connections for this firmware and the original Spherebot firmware are different.
| Arduino | Stepper Driver |
|---|---|
| D5 | rotation, enable stepper |
| D6 | rotation, step |
| D7 | rotation, direction |
| D11 | pen arm, enable stepper |
| D12 | pen arm, step |
| D13 | pen arm, direction |
You will also need to connect the following pins of the A4988 breakout board.
| Pin | Connection |
|---|---|
RESET |
SLEEP |
SLEEP |
RESET |
| MS1 | Logic+ |
| MS2 | Logic+ |
| MS3 | Logic+ |
There's a direct connection between RESET and SLEEP, this allows the driver to function. The connections between MS1, MS2, and MS3 to the positive logic supply voltage will set the driver into 16-step microstepping mode.
Besides the stepper breakout boards, you will need some 100uF capacitors to buffer the input for the motors. And there's one step you definitely have to take: calibrating the stepper drivers to deliver the right amount of current to the stepper motors.
You want the motors to be driven at their rated current. This means you need to find the current sense resistor \(R_{sense}\) on the A4988 breakout board. This determines the \(V_{ref}\) according to the following formula.
\[V_{ref} = I_{motor} * 8 * R_{sense}\]
With your motors not connected, adjust the current settings of the motors.
On the A4988 boards you will find a small metal potentiometer, connect your multimeter negative terminal to ground and the positive terminal to the potentiometer. Measure the voltage. Adjust the potentiometer so the voltage you read is equal to to the \(V_{ref}\) calculated earlier.
For me the current sense resistor was 0.1 Ohm, and the rated current of the motors was 1.2A, so I adjusted the voltage to \(1.2A * 8 * 0.1Ohm = 0.96V\). But these values can vary substantially from vendor to vendor.
Think about the power supply. I had problems with a weak power supply. When the board would drive just one motor, motion was super smooth and controlled. When I switched on the second motor, motion would become shaky and the motors would loose a lot of steps and generally not perform.
I'm currently in the process of replacing the weak lab supply with an old ThinkPad power adapter, to make sure the motors can draw enough current.
Software
With the hardware ready to go, flash the Arduino sketch you find in thunderbug1's Github repository to the Arduino. You should now have a working Spherebot.
thunderbug1 has a host controller in this Github repository. Try using this controller, it's by far the best option I have seen to control your Spherebot.