Two months ago a coworker of mine and me were taking an exam together. Everything seems to be going along smoothly, when 45 minutes into the exam the coworker starts to talk to the instructor, gesticulating wildly. I can overhear the instructor giving him two options: either figure it out or reset the machine to the beginning state. Now the exam was hands on. That is you have to setup service, test and
debug on your machine. Out of the 150 minutes available he opted to reset at 45 minutes into the exam. He was visibly distraught.
It turned out, that he botched the resize of a filesystem. He had dutifully unmounted the volume in question and resized the logical volume. The oversight was that he didn't shrink the filesystem. When he rebooted the system there was a kernel panic. This was the situation he was confronted with. He was half into the exam and the system wouldn't boot up anymore.
The coworker choose to reset the machine and start over with the exam. Can you do better? The filesystem was on an ephemeral mount-point uncritical to the functioning of the system. You can still boot into single-user mode and start emergency procedures.
Let's get us into the situation:
  [root@localhost ~]# lvs
  LV      VG       Attr   LSize  Origin Snap%  Move Log Copy%  Convert
  lv_root VolGroup -wi-ao 32.00g
  lv_swap VolGroup -wi-ao  3.88g
  testlv  testvg   -wi-a-  4.00g
Add the following line to /etc/fstab:
/dev/mapper/testvg-testlv /test ext4 defaults 1 1
Create the mountpoint and test the mount:
  [root@localhost ~]# mkdir /test
  [root@localhost ~]# mount /test
  [root@localhost ~]# ls /test/
  lost+found  test.1.0  test.txt
  [root@localhost ~]# cat /test/test.txt
  test
Now to the resize. Note that the -r option to lvresize resizes the underlying filesystem before touching the logical volume. This ensures a proper resize, but:
  [root@localhost ~]# umount /test
  [root@localhost ~]# lvresize /dev/mapper/testvg-testlv -L 2G
    WARNING: Reducing active logical volume to 2.00 GiB
    THIS MAY DESTROY YOUR DATA (filesystem etc.)
  Do you really want to reduce testlv? [y/n]: y
    Reducing logical volume testlv to 2.00 GiB
    Logical volume testlv successfully resized
  [root@localhost ~]# shutdown -rf now
Now the system reboots to the following screen:
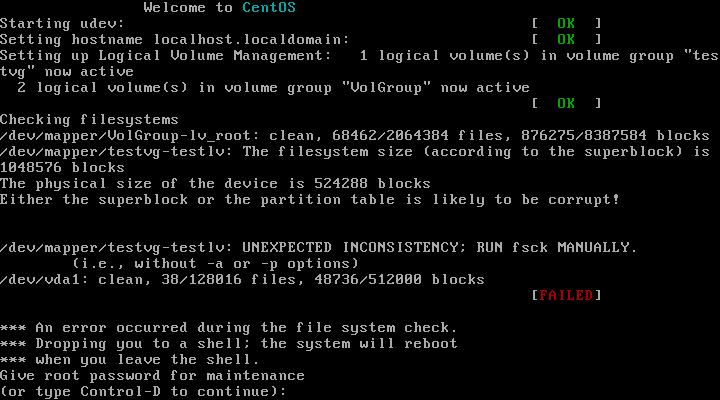
It's hosed. Enter the root password. The slash partition is not affected by this operation since it's on a different volume group. Now remount slash writable:
(Repair filesystem) 0 # mount -o remount,rw /
Find the necessary backup of the metadata. This is located in /etc/lvm/archive on my system.
Contrary to this /etc/lvm/backup contains the current configuration. Use your editor to
inspect it, to ascertain you have the correct file. Then pass the file and the volume group name to the vgcfgrestore command:
(Repair filesystem) 10 # vgcfgrestore -f /etc/lvm/archive/testvg_00012_1773263284.vg testvg
At this point you can reboot the system by hitting control-D. It should startup right away and you should be able to verify that the filesystems integrity has been unharmed:
  [root@localhost ~]# cat /test/test.txt
  test
  [root@localhost ~]# umount /test
  [root@localhost ~]# fsck /dev/mapper/testvg-testlv
  fsck from util-linux-ng 2.17.2
  e2fsck 1.41.12 (17-May-2010)
  /dev/mapper/testvg-testlv: clean, 13/262144 files, 543313/1048576 blocks
There you go. In case you botch the resize, there's no need to panic. Restore the volume group to
a known good state instead of doing a full backup or in our case a reset of the machine. There's
much time to be saved in doing it this way.
Better yet hit man 8 lvresize and lookup the -r option and heed the warnings of your tools.
Above all: keep calm.